Woodworking is a hobby enjoyed by millions of men and women around the globe. From those who participate in large scale operations with access to almost every type of woodworking tool imaginable, to the home woodworking enthusiasts plying their craft from their garage or shed, the art of woodworking is one of the most popular and well-loved hobbies on the planet.
And while many of these hobbyists focus almost exclusively on personal projects—projects they intend to keep and use—there is now a growing number of woodworkers who have found success in selling their crafty creations to the general public.
Pick Your Niche And Do Your Research
Have a look around the various market places to see what sells and for how much money. If you’re a beginner, you might want to start with some really basic wood projects, like picture frames for instance.
They can be made quite quickly and be made to look really attractive with some simple paintwork added. You’re also able to add value by producing custom sizes to customers requirements.
Once you’ve honed your skills on the basics, you can move on to slightly more advanced projects and expand from there.
So, if you like how that sounds and you want to transform your woodworking shop or garage into a money-making enterprise, the following article may prove very useful.
Here We Have A Selection Of Easy Wood Projects That You Can Make And Sell
To get you started, here in this article we have highlighted and explained several woodworking projects that seem to appeal to certain buyers in today’s market place—easy woodworking projects that truly sell!
Project 1: Square Wooden Stacker (Child’s Toy)
Do you remember the wooden stacker block toys you used to play with when you were a kid? The four square blocks, each with a center-drilled hole of different diameters, that you had to stack in just the right order of size over a vertical wooden tube and base?
Toys such as these, although considered old-fashioned today given the new child-loving gadgets on the market, can still offer a toddler hours of playful fun while also teaching the child valuable problem-solving skills.
Below we will describe these stacker toys in a bit more detail, and highlight some of the tools you will need to complete the project.
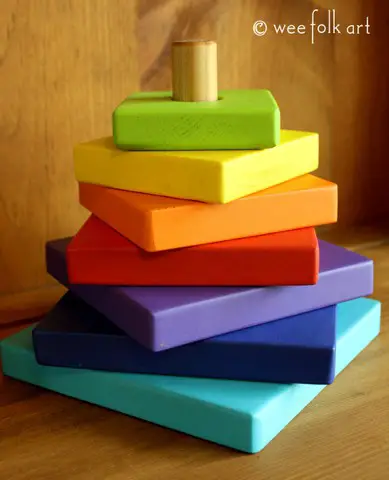
 Image from weefolkart.com
The base of the wooden stacker block toy is perhaps the most difficult to build. It consists of a square wooden base that must be drilled out about half way through with a cordless drill and large center bit.
Into this hole, a rod will be securely glued into the middle using wood glue. The rod you select will need to be tapered from bottom to top using any number of hand tools, such as a sander, chisel, and/or a handheld planer or lathe.
Next you will build the four square blocks that will go over this vertical rod. These blocks can be made from two-by fours that are cut to size. The largest block must be drilled out so as to comfortably, yet snugly fit over the base of the rod, where it is largest in diameter.
Each of the remaining blocks will also be drilled with the next diameter in mind.
For purposes of problem solving, it is important that all four of the blocks will only fit on the rod in a specific order, forcing the toddlers to examine each block before making a decision as to its placement.
With just some simple sawing, drilling, sanding and planing, you too can build a wooden stacker toy that you can sell at places like craft fairs and toy stores. There will always be a strong market for well made childrens toys.
Click here for full instructions from weefolkart.com on how to build this toy.
Project 2: Wood Box
The wood box is perhaps the most basic of all woodworking projects, but that does not mean it is necessarily the easiest.
Still, when completed, this little box will give you a grand feeling of satisfaction and accomplishment. Moreover, because a box has such a wealth of potential uses, these types of woodworking projects tend to sell very well on the open market.
Whether it’s used to store coupons or bills, jewelry and makeup, or even small toys, there are literally a million uses for a well-made wooden box.

A simple wooden box should start with a rough piece of hardwood, such as oak or cherrywood, along with plywood that is cut to the size.
The types of tools needed to complete this project will really depend on the method of joinery you elect to use, but usually you will need a table saw to rip the wood pieces to length, a power drill for fastening hinges and inserting the necessary screws at the corners of the box, a hand sander to clean up the edges and sand the project smooth, and a paint brush for adding stain or paint to your new creation.
Keep in mind that there are many, many ways to construct a simple wooden box, but regardless if you choose screws, glue or even a dovetail joint to secure the various pieces of your box, when it is finished you will have a marketable creation that is very easy to sell.
Project 3: Bird Feeder
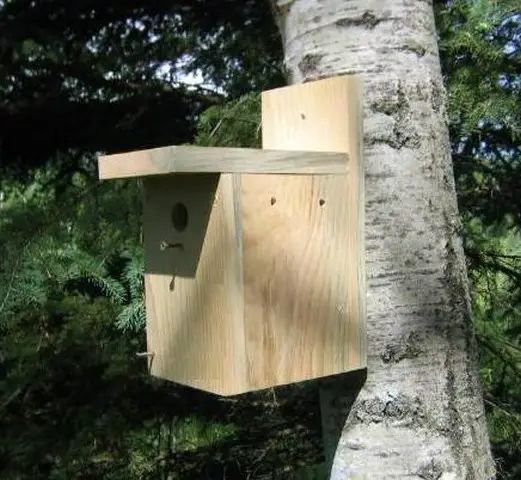
 Image from wayneofthewoods.com Get full plans and details of this bird feeder here
If you are looking for a project that will help you get closer to nature—a project that will also sell very well at craft fairs, street fairs, farmer’s markets and the like, than a birdfeeder project may be the ideal solution.
There are many different types of designs you can choose when making a bird feeder, designs that range from very simple to highly elaborate, but all of them will require a few necessary tools and at least a little bit of know-how.
Some of the tools required to make a birdfeeder range from power and hand saws to drills to power sanders. You will also require drill bits, a hammer and wood glue to create strong joints on the corners of your creation.
A bird feeder should consist of a roof, floor, four sides and adequate space for the birds to fly in and out.
Transparent sides are recommended, as these will allow you to monitor the bird feed level. Transparent sides will also allow you to watch the birds as they enter and exit the feeder.
Some bird feeders are designed to allow for “gravity feeding,” where more feed drops automatically into the feeding zone. Most bird feeders are constructed from ½ inch plywood or hardwood, although ¾ inch stock can also be used.
Once completed, we recommend that you thoroughly seal the wood with a wax sealant to protect it from rain and other moisture. People will certainly buy this.
Project 4: Cordless Drill Storage and Charging Station
This next project is a Godsend for any workshop or garage—a cordless drill storage compartment and a charging station for the batteries that operate them.
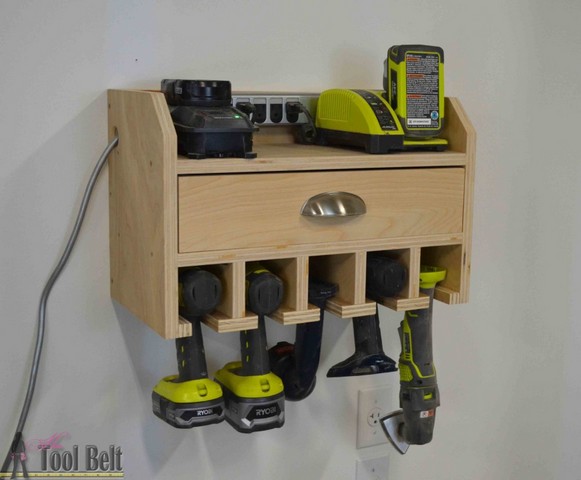
 Image from hertoolbelt.com Get all the info here to make this money making accessory
Made to hang from one of the walls in a workshop, a cordless drill storage system keeps all your drills and impact wrenches up and out of the way and, best of all, off the floor where they can become damaged.
The size of your cordless drill storage compartment and charging station will vary depending on how many drills and batteries need to be stored. You can even add a small drawer within the unit, giving you a convenient place in which to store your drill bits and other hardware.
To make the cordless drill storage and charging station you will need a four foot by four foot piece of plywood or hardwood. This wood is then cut down to size in order to form the top, bottom and sides of the storage system, as well as the dividers in between that will evenly space each drill from the next.
Unless you are using self-tapping screws, you will need to pre-drill each fastening point using a hand drill and small bit. This will keep the wood from splitting.
When all the pieces have been “screwed and glued” together, wait overnight for the glue on the cordless drill storage and charging station to dry, then sand it down carefully with a belt sander to smooth it.
Use screws to fix the top of the charging station to the wall studs in the garage, and be sure to locate the storage system next to an electrical outlet to make charging possible.
This wood project can command quite a decent price as it will normally be custom built to order.
Project 5: DIY Drawer Dividers
We all have that one drawer in our house that seems to be dedicated to junk. And the problem with a drawer like this is that you can never seem to find the item for which you are searching.
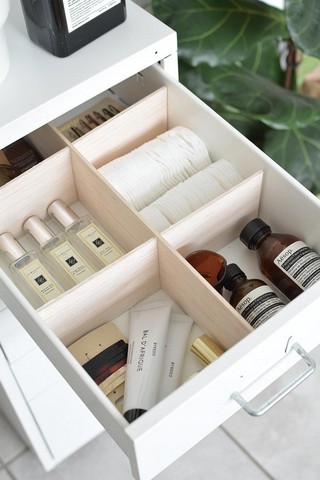
 Image from burkatron.com Visit burkatron.com for all the details on making this item
This can be frustrating at the very least and absolutely maddening at worst, leaving you wishing for a more organized space.
Fortunately, with these DIY drawer dividers you can introduce into your home a much more organized system of storage.
As their name suggests, DIY drawer dividers effectively divide the drawers in your home so that each type of item has its own particular spot. This type of organization not only makes items easier to find, it declutters your space—and your life.
DIY drawer dividers are typically made from a thin wood product like balsa wood. Once you measure the drawers and determine the pattern of the dividers, your best bet is to use a carpet knife to cut the dividers to size.
Then, while looking at the pattern, you can either glue and/or staple the various dividers together, before placing the dividers into the drawer.
This enables you to create a temporary organization solution without actually nailing or screwing into the drawer itself.
A good way to sell off-cut pieces of lumber!
Project 6: DIY Faux Drawer Console Table
Is the entry room of your home missing a great statement piece? Could you use a cool new table just inside the door that is sure to impress your neighbors and friends while also serving a number of convenient purposes?
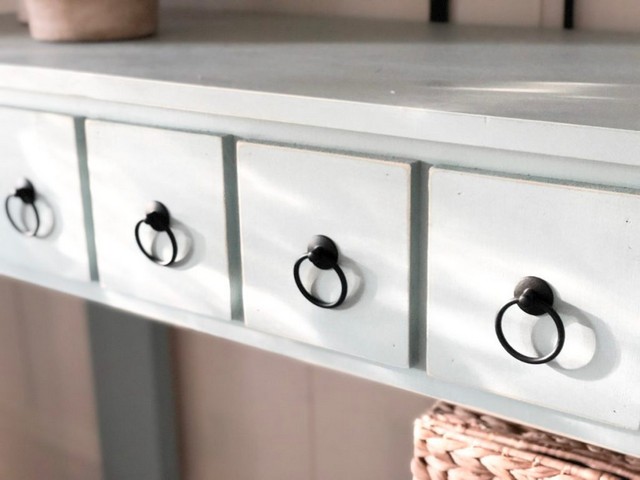
 Image from shanty-2-chic.com click here for full details of how to make this piece of furniture
If you said yes to both of these questions, a beautiful do-it-yourself faux drawer console table may be just what you need.
So what is a console table? A console table typically measures 5 to 6 feet in length, by roughly 3 feet in both width and height. It is intended to be the first piece of furniture seen by visitors, and it has plenty of surface area on which to place things like flowers, plants, artwork and other collectibles.
Although the knobs on the face of the faux drawer console table seem to indicate an underlying drawer of some kind, these knobs are typically just decorative in nature.
Making a console table such as this usually requires a table saw and/or a circular saw, a handheld drill and impact wrench, and a belt sander with several different grains of sandpaper.
Most craftsmen will also use wood glue on the structure. Once constructed, these items are very hot sellers at places like craft fairs and furniture expos, especially those made from quality hardwoods and those adorned with special features. This should fetch a good price if well made.
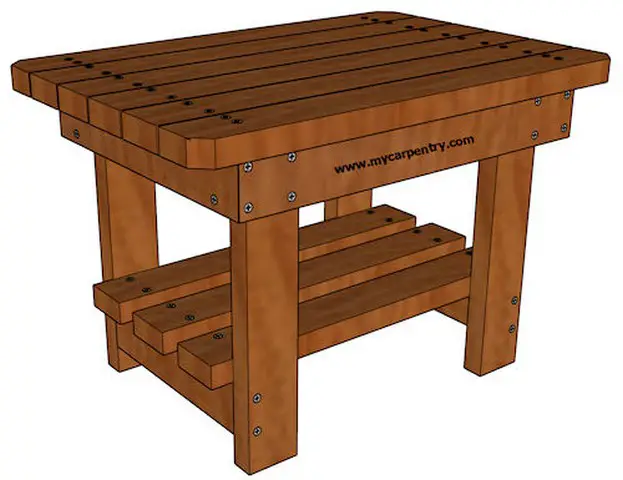
Project 7: Patio End Table
Are you one of the millions of Americans who enjoy outdoor entertaining? If so, this patio end table project will certainly impress your guests at your next BBQ or outdoor function.

Plastic patio end tables are sold by the thousands in this country, and while they serve an important function for some people, they are generally very flimsy and unstable.
For that reason alone, wood-based patio end tables such as these can be very marketable items.
The great thing about this patio end table is that the whole of the project is constructed using 2 by 4 lumber that is, of course, cut to various sizes. This includes the legs, top and bottom base, and the top and lower shelf on the piece.
The top of the patio end table, as well as the lower shelf, is made from 2 x 4 lumber that is laid across horizontally along the top base and bottom base, respectively, to form a sturdy and stable surface.
Because of the table’s potential exposure to the weather, certain types of lumber are better than others for this project, types such as redwood, cedar or even pressure-treated pine wood.
A good stain can spruce up the color and a sealant is also recommended.
Makers of this project will require a table saw or circular saw to cut the 2 x 4 lengths to size, a brad nail gun to tack pieces together after they have been glued up, and a power drill to screw the various pieces together.
The top can be fitted to the base using a pocket hole jig and the necessary screws. Should sell well during the summer months.
Project 8: DIY Wooden Coasters
If you’re looking for a project you could literally complete in just an hour or two—a project that will also sell—you might want to make some wooden coasters.


Wooden coasters can be made from a variety of wood types, and as long as you use a stain with a sealant at the finish you can get as creative as you want with these items.
To make wooden coasters, start with a long 1 x 4 piece of lumber in a wood of your choosing. Next, use a carpenter’s square or a tape measurer to mark every four inches along the piece.
Because the width of the board is already 4 inches, this will give you perfectly square coasters. Using a circular saw or miter saw, carefully make your cuts until you end up with 4-6 four-inch by four-inch squares.
With a block plane, you can now round off all the sharp edges on the pieces, then sand each coaster, first using a 120-grit paper before moving to 180-grit and finally 220-grit sandpaper.
This will give your coasters rounded off edges and a very smooth feel. Finish each coaster using wipe-on oil, and once that has dried, use a paste wax that will help repel liquid and ultimately lead to a longer lifespan for the coasters.
People will queue up to buy these if you pick the right lumber with nice figure and color!
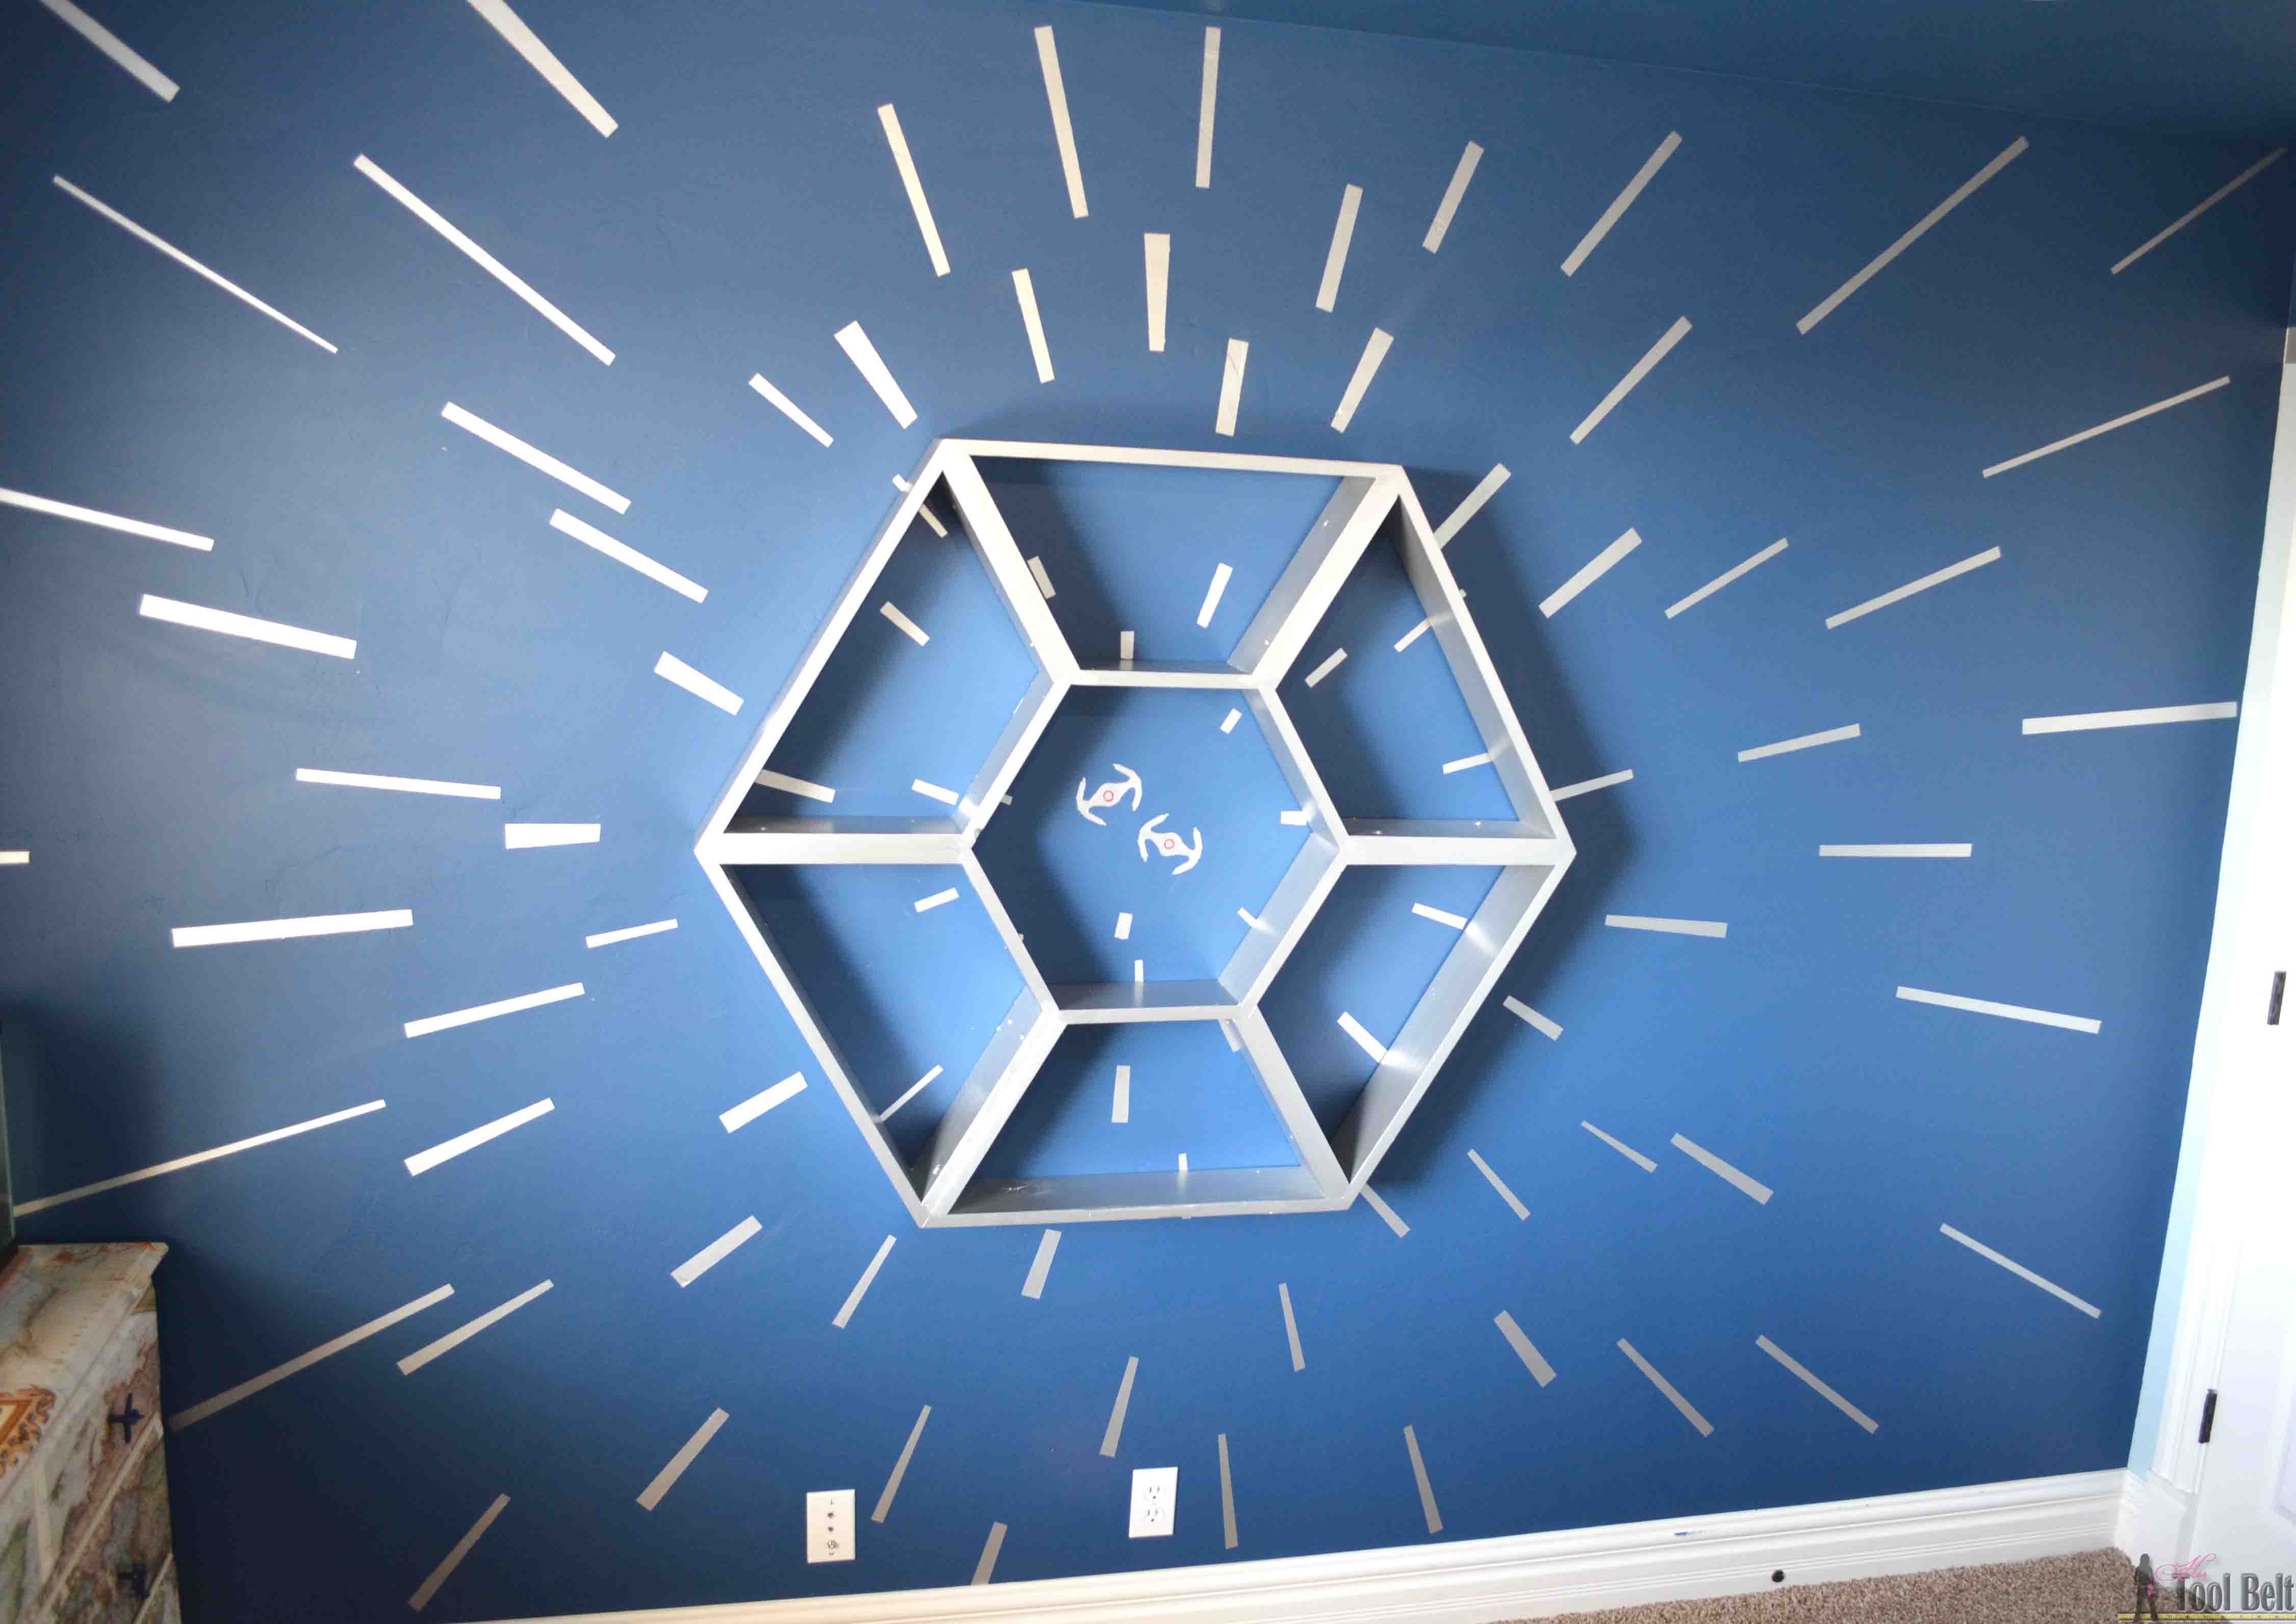
Project 9: Star Wars Shelf and Hyperspace Wall
If you “dare to go where no man has gone before,” you should really try building this unique Star Wars Shelf and hyperspace wall. Great for a sci-fi-loving children’s bedroom, this will definitely be a hot seller at your next fair.

 Get the plans and details from hertoolbelt.com here
To make the Star Wars Shelf and hyperspace wall you will need roughly 5 8-foot sections of 1×6 lumber. These pieces are then cut down to size to form both an inner and outer hexagonal shape, with pieces of lumber extending from the outside corners of the center hexagon to the inside corners of the outer hexagon.
These pieces are then glued together using a high-quality wood glue that will need to sit overnight to set. Once it has set, use silver magnetic paint to cover it.
Once you have made the hexagonal Star Wars Shelf, choose a space on the wall and paint this background blue. You can then add decals or trace in various Star Wars themed ships to create an awesome hyperspace wall that all children will love and want to buy.
Project 10: Cedar Bath Mat
Making a cedar bath mat is another project that can be completed quickly with just a few materials and tools. When finished, it will serve as a statement piece in your bathroom that is also very useful and unique.

 Find all the plans and info here at familyhandyman.com
The cedar lumber that you purchase for this project can be bought in either 1 x 2 or 1 x 6 lengths. If you choose the former, you will only need to make 1 rip cut down the middle of the pieces to create the desired 1-inch by 1-inch pieces you will use for the project, while a 1 x 6 will require 4 more rips.
Once you determine the dimensions you desire for your new cedar mat you can make the required cuts.
Using a round over bit and router, we recommend you round off any sharp edges on your slats before you start to nail the pieces together. Next, lay out the 8-10 slats that will serve as the top of your cedar mat, leaving approximately ¼ inch between each slat.
Cut three pieces of 1 x 1 cedar to match the width of the mat, and lay them on top of the slats perpendicularly, with one piece near either end and the last piece evenly spaced in the middle (this will be the bottom of the mat).
Use 1-1/4-inch brad nails to attach the bottom slats to the top of the bath mat.
Once everything has been assembled, you can use a sanding block to smooth out any rough edges on your creation before staining and sealing the bath mat.
We also recommend that you cut out some anti-slip pads and place them on the bottom of the cedar bath mat to prevent it from slipping underfoot.
An easy project and surely a bargain for buyers.
Project 11: Wooden Sofa Sleeve with Cup Holder
When cuddled up on your sofa, perhaps reading a book or watching TV, it can often feel very inconvenient to pitch forward to the coffee table every time you want a sip of your favorite beverage.

That is exactly why you need a wooden sofa sleeve with an integrated cup holder. A wooden sofa sleeve is a handy and ultra-cool invention, one that would be highly sought by any buyer that values convenience.
The first step in making the wooden sofa sleeve is to measure the arm of your couch (or the standard couch). Once you have determined the proper width and desired length of your couch sleeve, you can make your cuts using a circular saw or miter saw.
The two pieces that will effectively cover the width of the sofa should be of equal size for balance, while the top piece will vary in length depending on the user’s preference.
Prior to gluing and nailing the three cut pieces of lumber together, you will need to use a hole cutter to drill through (or almost through) the lengthwise board to create the cup holder. You will also need to sand any of the rough edges using a belt sander or block sander, and paint or stain the piece if you so desire.
This is not everybody’s cup of tea, but I’m sure there is a certain market for it.
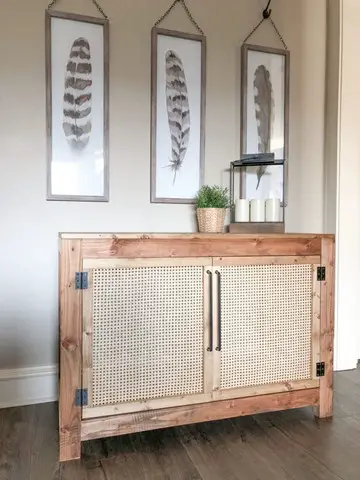
Project 12: DIY Cane Cabinet
Cane furniture is all the rage right now and is a very hot seller among many shoppers. Its inimitable and natural style harkens back to the ancient Asian furniture of yore—simplistic yet very natural and chic.
 Find all the instructions and plans at shanty-2-chic.com
Cane furniture is simply those pieces that have cane stretched along a certain portion of the furniture, usually in a mesh or crisscross pattern of some type. In this case, the DIY cane cabinet, the cane feature is built into the front of the doors, giving the piece a warm and inviting aesthetic.
The simplicity of the cane mesh looks striking against the strong and rugged frame of the cabinet and it is sure to attract many buyers. This is not a simple piece to build, as it requires a lot of cutting, both rip cuts and cross cuts, precision gluing, screwing and nailing, not to mention the painstaking process of intertwining and fastening the cane mesh.
Door hinges and knobs will also need to be added to complete the project.
Woodworkers—and buyers—who want to bring a taste of 18th century Williamsburg into their modern homes will absolutely love this DIY cane cabinet.
Project 13: Barn Birdhouse
Those wanting to help small birds (such as wrens and the like) nest will simply jump at the chance to buy this very quaint barn birdhouse.
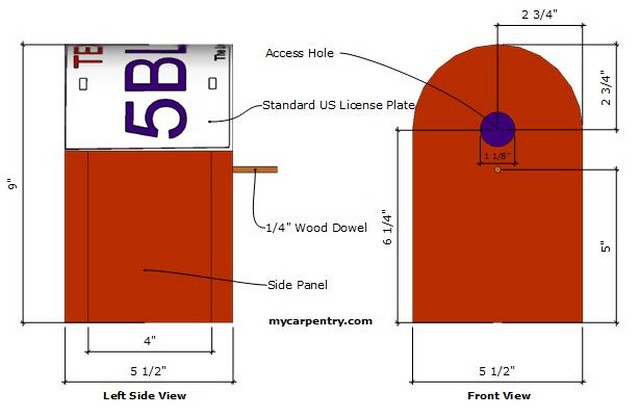

According to the plans for this birdhouse, the only materials you will need is a piece of cedar fence board—a board measuring 1 inches by 6 inches and measuring 6 feet in length, and an old license frame for the roof (a piece of tin cut to size will also suffice).
The front and the back pieces of the barn birdhouse come to a large dome at the top. These can both be cut simultaneously using a jig saw.
The side pieces come about ¾ of the way up, where the folded license plate or tin takes over to form the roof. Using a drill you will want to make 2 holes in the front of the structure.
The first is the access hole, located about two inches from the top and directly in the center of the board. A paddle bit is the perfect size for this access hole.
About one inch down from the access hole, and again in the center of the board, you will need to drill another smaller hole. This is where you will place the bird stand—a ¼ inch wooden dowel.
Of course, you can always use paint to decorate your creation, but the natural cedar looks very good against the barn’s backdrop.
Quick to make and easy to sell.
Project 14: Zigzag Shelf
The zigzag shelf, when fully built and installed, is a true statement piece like none other. Thinking back to the 1970s, when geometric figures were king, this special and truly unique shelf system is sure to turn heads at your next garage sale.


So what exactly is a zigzag shelf?
This eye-catching shelf system is designed to spruce up a given corner in your home, while also providing a series of surfaces on which to place some of your favorite items.
Going from floor to just near the ceiling, it is made from one-square foot panels, each measuring 1 to 2 inches in thickness. The pattern is created by placing the boards/panels in a horizontal/vertical pattern as it climbs up the corner of a wall.
The square panels, some of which will serve as shelves, are placed together using a rabbit joint and super-strong wood glue. The shelves and support pieces are stained to bring out the character of the wood; and the only fastening hardware is hidden nicely up against the bottom of the shelves where the support pieces meet the walls.
Woodworkers attempting this project will need to use a variety of saws to cut the shelves and the support pieces to the proper length and width, a hand sander to smooth the boards, and a router or plow plane to round off the edges of the panels.
The quality of the lumber that you choose will affect the market value of this project.
Project 15: Whiskey Barrel Coffee Table
Those looking to bring a taste of the old west into their homes will jump at the chance to purchase this rustic whiskey barrel coffee table. The table is made by cutting an old whiskey barrel in half (lengthwise).

 See the full details and more at diypete.com
The rounded end of the table then sits in dual cradles that the woodworker will need to use a jigsaw to cut to the proper size. The barrel is then nailed off to the cradle with the flat or open side of the whiskey barrel facing upwards.
Onto that upward facing side, the craftsmen will then nail or screw a 2-inch wide rectangular board measuring about 5 feet in length by 2-1/2 feet in width. This tabletop can be made from any type of wood you wish and stained to bring out the rustic flaws in the wood.
This is a very simple project provided you can find an old whiskey barrel to serve as the centerpiece for the table.
This type of furniture will be always be sought after if made well and will fetch a high price.
Project 16: DIY Corbel Sconce Light
This DIY corbel sconce light will look great in your game room or cabin. The first thing you will need to find is a rattan “hurricane,” a basket-like structure with a flat bottom.
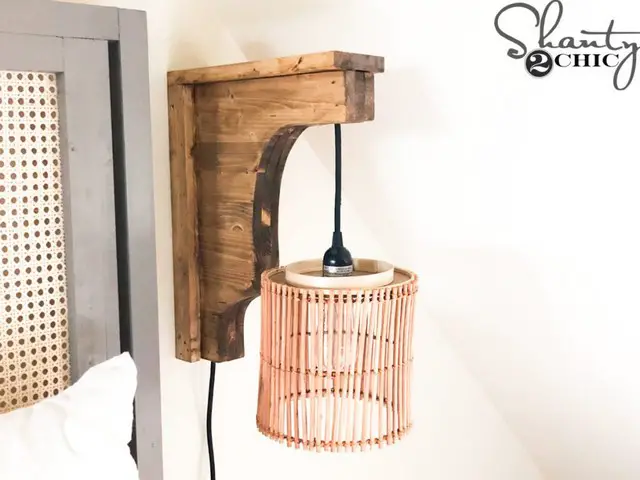

In a pinch, any type of wicker or rattan basket will do. Using a paddle bit, drill a hole into the bottom of the basket. This is where the light fixture will be placed. Next you will need to build a cleat-like sconce that the light and light cover will be attached to.
Once you determine the size and shape of the sconce you prefer, make a jig and cut 2 two-by-fours to shape and size using a jig saw. Next, hollow out the inside of these sconce pieces using a chisel or router—this is how you will hide the cord.
After seating the cord, glue the two sconce pieces together to form one thicker sconce, and seat it on the wall making sure to drill directly into a stud.
This project takes some time and patience to complete, but once it all comes together you will have a durable, attention grabbing piece that buyers simply won’t be able to resist.
Project 17: Decorative Wooden Wheelbarrow (for Thanksgiving)
During the autumn holiday months, you have no doubt seen those small, old-fashioned wooden wheelbarrows, usually adorned with small pumpkins and other gourds.
Well, now you can make your very own wooden wheelbarrow—an item that is always a great seller at fall shows.
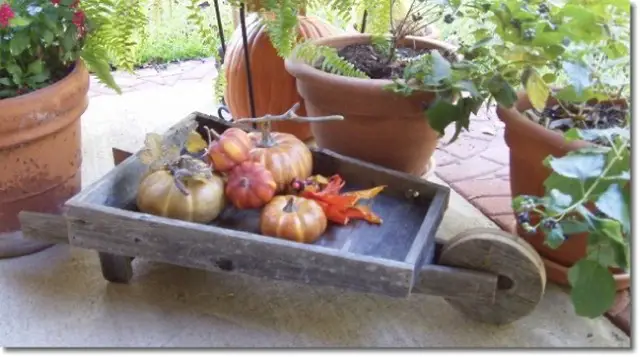
 mycarpentry.com has all the required details to build this
To make this decorative wooden wheelbarrow you will need to use nothing but fence boards, the older the better to give the piece a rugged look and feel.
The fence board is ripped down the middle using a table saw; the handles should measure about 30-inches each and they are held together using two cross members of different lengths.
At the front of the decorative wheelbarrow is the wheel, which can either be made using a large drill bit or a jig saw. At the back are two small pieces that serve as the rear legs, which stabilize the design.
Everything is put together using glue and brad nails.
From start to finish, the entire project takes about an hour and the material costs are very minimal, especially when you consider the value the project will have when sold.
Project 18: DIY Wood and Epoxy Clock
Another fun project to make is the DIY wood and epoxy clock, an item that has a lot of interest these days from prospective buyers.
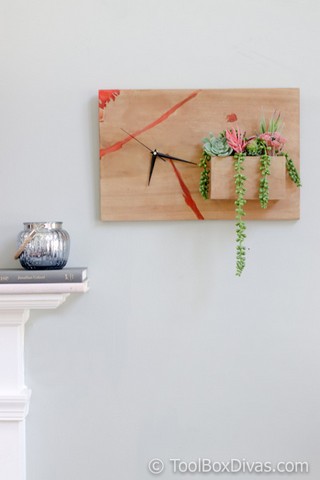
 All the info is at toolboxdivas.com
To create this project you will first need to gather a few supplies together, including a 1 x 12 board that is cut to the desired length, epoxy resin in your choice of colors and, of course, a clock movement mechanism.
The great thing about this project is that just about any old piece of scrap wood is fine. In fact, you want some pieces with cuts and imperfections, as this is where the epoxy will be placed to give the piece the desired color.
With your board picked out, you will want to use a Dremel rotary tool to further hollow out the board’s imperfections. Next, mix your epoxy according to the instructions and begin filling the holes.
Allow ample time for the epoxy to dry, and then attach the clock movement mechanism to the front and back of the board. Some people also add a small planter to the front of the board.
This is achieved using craft board that is bent into shape and then affixed to the front of the clock.
Project 19: Real Woodworkers Work Bench
Whether you are just starting out with your craft or you are an established master woodworker, every shop requires a functional work bench. In fact, some woodworkers exclusively make and sell work benches to other would-be craftsman, adding all the bells and whistles needed to make these work spaces ultra-functional.
Instructions can be found at instructables.com
In most cases, the tops of workbenches are constructed by cutting several pieces of plywood or MDF board to the desired size. These pieces are then glued up tightly using wood glue and a series of shop clamps to guarantee a strong hold.
The legs are generally constructed with 4-inch by 4-inch posts that are cut to the desired length, which ensures the stability of the work area. Many workbenches also have a shelf underneath the main top, which is used to store tools and accessory items one would need when working on a project.
Vises can be added to one or both ends of the table, and often “dog” holes are drilled into the top of the work surface—holes that are used in conjunction with clamps to hold projects in place.
A very valuable piece of equipment which many people will want to buy.
Project 20: DIY Holder for Wine Bottle and Glasses
The DIY Holder for Wine Bottle and Glasses might possibly be the easiest project on our list—and also one of the best-selling.
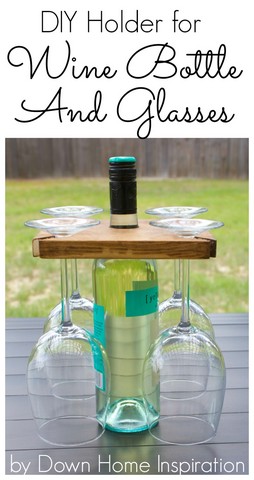

This table top holder is made using a 1-inch thick board that will need to be cut to its square size (7.5 inches by 7.5 inches) using a miter saw or jig saw.
Using a carpenter’s square, find the exact middle of the board and, using a power drill with a 5/8-inch bit, drill a hole directly in the center—this is where the neck of the wine bottle will be placed from the underside of the board.
The wine glass holders on this piece are located at each of the four corners. They are made by making a 2-inch long cut using a jig saw or scroll saw and a 1-1/2 blade.
Once all the cuts have been made, you can sand the piece by hand or with a Dremel rotary tool before staining or painting the holder to match your preferences.
You can use the color of your customers requirements to add value.
Project 21: Wooden Beer Totes
Looking for a gift for your best bud’s bachelor party? How about these wooden beer totes?
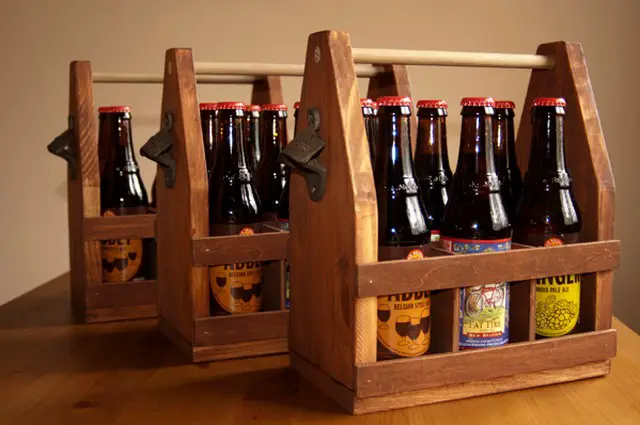

These beer totes hold an entire six-pack of your favorite bottles and look great at any party.
The rectangular bottom of this project can be made from a standard piece of plywood, while the sides, which start as rectangular in shape and angle towards a triangle halfway up, are made from pine or oak that is cut to size using a scroll saw or jig saw.
The two sides are connected at the top of the piece using a ½-inch glued-in dowel that serves as the convenient handle for this one-of-a-kind beer caddy system.
Quite easy to sell in multiples!
Project 22: Wooden Welcome Mat
The wooden welcome mat described here is another great gift idea, this time for a house warming party or to celebrate your child’s first home.
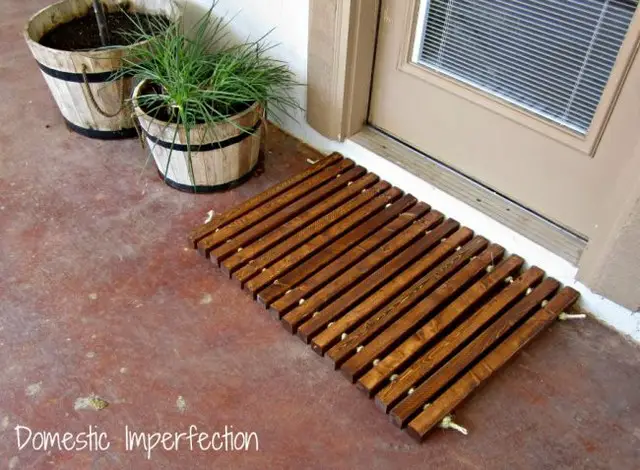
 Find all you need to make this at domesticimperfection.com
It is made using 2 x 2 pieces of cedar (a great wood for outdoor projects). The cedar planks, of which you will need about 20 for a good-sized mat, are then cross cut to exactly 2-feet in length.
Once the boards have been cut, use a tape measurer to mark 3-inches in from both ends of each board and place your mark directly in the middle (1-inch).
Now you will need to drill a half-inch hole into each side of every plank. You can do this using a hand power drill, but you can really save time if you have a drill press.
Now that all the holes are drilled, link all the boards together using some type of decorative rope or twine. Knot the rope at the end of each side and viola, you have made your first wooden welcome mat.
Make yourself a jig to get a production line style operation going to increase your profits!
Project 23: Raised Planter Box
A raised planter box is a great solution for gardeners who lack the yard space for a ground-based flower or vegetable garden.
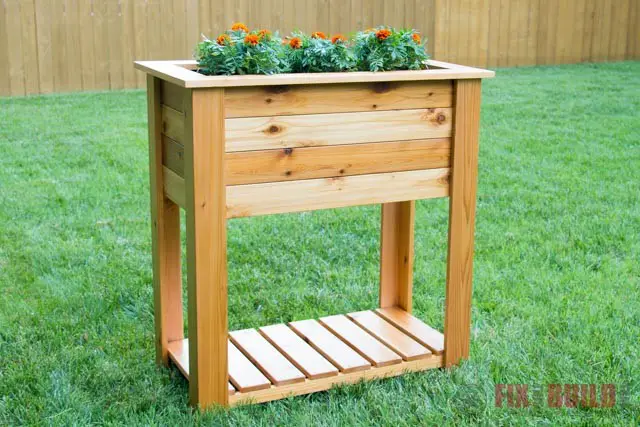
 Get the lowdown on this raised planter at fixthisbuildthat.com
This particular raised planter box stands about 3 ½ feet high and has lots of detail to catch the eye. The entire structure, from the legs to the planter itself, is made from cedar boards.
Horizontally placed boards are nailed to the vertical legs to create the box, and a nice cap along the top of the piece finishes off the attractive project.
To create this planter box you will need a 12-inch miter saw, a cordless drill/driver, a belt sander and a compact router among other tools, along with landscaping mesh to prevent any weeds.
When completed, you’ll have a nice 2-foot by 4-foot space in which to nourish your favorite plants, or to sell for some extra cash!
Project 24: Cutting Board
Anyone who cooks or chops veggies in this great country (which is almost every adult) has a need for a high-quality cutting board.
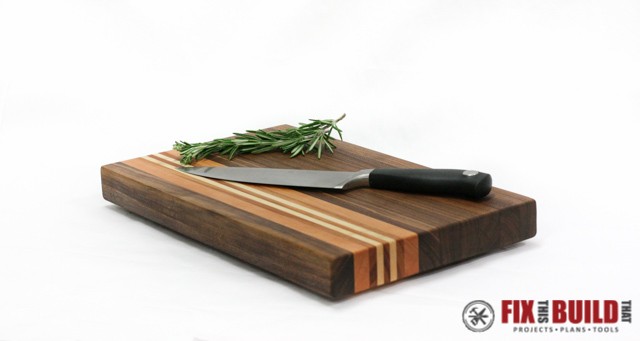

This is what makes these items such hot sellers at the various swap meets, fairs and expos throughout the country. One of the most positive aspects about making a cutting board is you can use any type of wood, from high-quality lumber to scraps around the shop.
You can even mix-and-match different types of wood to create a type of pattern that really stands out.
When it comes to the wood, the best sizes are 2 x 2 or 1 x 2. These pieces are then cut to length (about 16 inches) and glued together using your favorite wood glue product.
Use a clamp to ensure a strong hold, and allow about 12 hours for the glue to completely set-up.
The cutting board should then be sanded down using graduating levels of sandpaper, and given two to three coats of mineral oil to prevent warping and to season the wood.
An irresistible purchase for cooks.
Project 25: Peanut Butter Stick Birdfeeder
This project, which is great to do with your children, needs very little explanation.

 See all the instructions at innerchildfun.com
To make it, you will first want to find a sturdy stick or branch, measuring 2-inches to 3-inches in diameter. You will need to cut the stick to length, about 16 inches, and then place the stick into a vise.
Using either a hand drill or cordless drill and a 7/8-inch bit, drill holes in the stick that go about halfway through. Drill these holes on alternating sides of the stick so the birds can access the feed from every side.
At the very top of the stick, drill a small hole all the way through and then loop and knot some rope or twine through the hole. Fill up the larger holes you drilled with peanut butter, and attach bird seed to every glob of that peanut butter.
Hang the birdfeeder in your favorite backyard tree and watch all the birds flock to feed on your new creation.
Bird lovers will surely buy this one.
Project 26: DIY Wooden Cloud Shelves
Your children will love to help you make these wooden cloud shelves—shelves that are perfect for any child’s bedroom.

 Full info at dreamalittlebigger.com
Using a ½-inch piece of plywood, sketch a random cloud, shaped any way you desire, as long as the bottom is squared off at the edge of the plywood and measures about 15 to 16 inches in length.
Use a jig saw to cut out the cloud. Next, create a shelf by cutting a piece of 1x 4 lumber to the desired length. Screw the cloud and shelf together (starting at the back of the cloud) with wood screws.
On the backside of the piece, center up and attach a sawtooth wall hanger. Sand the project thoroughly by hand and paint the entire thing white.
Hang against a sky-blue painted wall to transform your child’s bedroom into a bright sunny sky. A quick and easy job for some quick cash.
Project 27: DIY Pallet Wood and Bed Springs Light
This Pallet Wood and Bed Springs Light is a cool project that you can basically make from old scraps and throwaways.
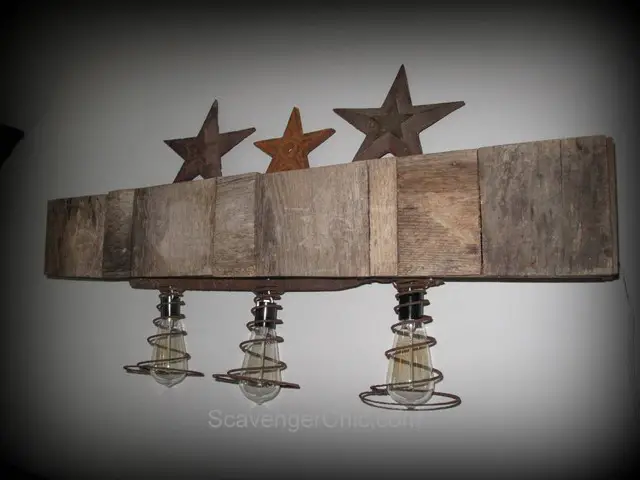

In this project, pallet wood is made to create a long rectangular box, and three holes are drilled in the bottom of the box to allow the bed springs and the lamp fixtures to be hung.
The end result is three cool lightbulbs protruding through a rustic box of wood that are now shrouded with springs. It even creates a handy wall shelf on which to decorate the fixture from above.
Project 28: DIY Pallet Wood Rustic Bench or Coffee Table
More and more people these days are making good use of old pallet wood. Such is the case with this do-it-yourself pallet wood rustic bench, which could also serve as a coffee table.
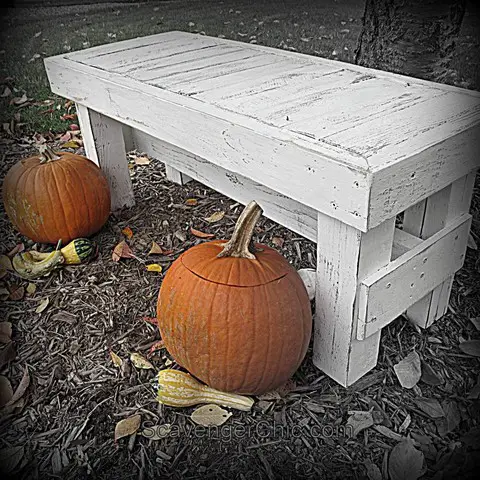
 Full details can be found at scavengerchic.com
In this project, sections of the pallet are cut to size to form the legs, and the bench or coffee table-top is made from many laminated pallet sections and sanded before being fastened horizontally to the base using wood screws and a cordless drill/driver combo.
A cross member ensures that the bench will be nice and sturdy, and the imperfections in the wood lend themselves to a very rustic feel.
Project 29: Vintage Wine Crate Coffee Table
This is a really cool project if you can find just the right materials. For this you will need to locate 4 square-sized vintage wine crates.
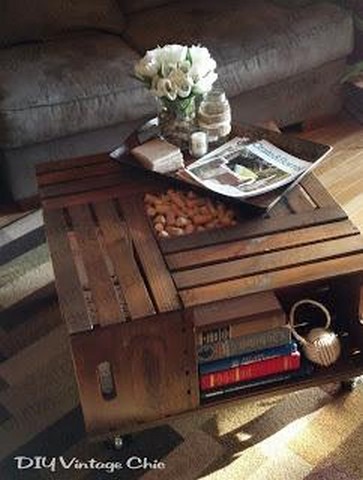
 Details at diy-vintage-chic.blogspot.com
Established wineries in your area might be a good place to look for these, and you can always try Craigslist as well. To make this project you will be basically lay each wine crate on its side with the open end facing out.
Then, using a hammer and nails or a drill and wood screws, you will firmly attached each wine crate together. When finished, you’ll have a beautiful slatted coffee table that is sure to draw eyes to any room in which it is placed.
This will sell for a good sum if well built and finished.
Project 30: DIY Outdoor Side Table
Last but certainly not least is this beautiful DIY outdoor side table.
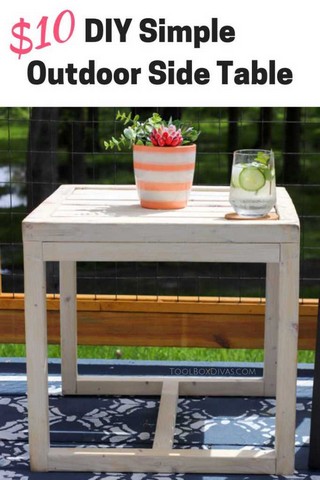
 See full info at toolboxdivas.com
This table is made from a mix of 2 x 2 and 1 x 3 lumber, all of which is cut by a hand saw or miter saw to 8 inches in length to form a perfectly square piece of outdoor furniture.
The legs of this piece are made from 1-inch corner boards that are screwed discreetly into the table’s upper base with ½ inch screws. The top of the table is then secured with wood screws and a power drill before the entire structure is sanded smooth using a belt sander and sanding block.
Once perfectly sanded, the table can then be primed and painted white (or any other color you desire.
10 dollars to make, but will sell for much more!
Look Into Online Sales For Your Wood Projects
Once you have your methods and preferences of things that you like to make, check out the opportunities online to offer your projects for sale. Places like ebay and etsy can be a good place to start.